

Ever notice that new‑look sterling silver necklace you just bought starts to lose its shine after a week of coffee spills and nightly skin oils? It’s that tiny, invisible film that builds up, and honestly, it can feel a bit disappointing when you’re excited to wear that piece.
Here’s the thing: cleaning a sterling silver necklace isn’t rocket science, but it does benefit from a few tried‑and‑true tricks that many of us discover the hard way. Think about the last time you polished a silver spoon or a vintage brooch – the same principles apply, only the chain is a bit more delicate.
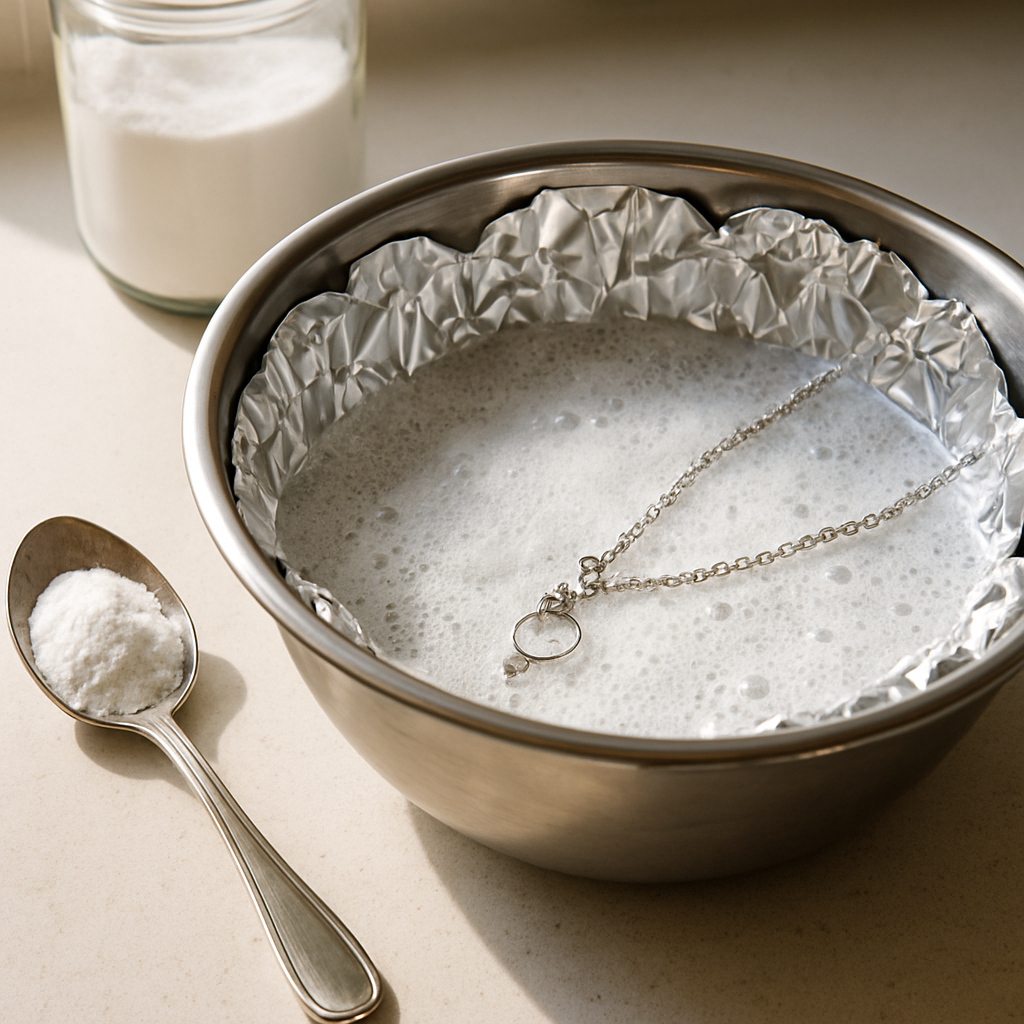
First, gather a few pantry staples: warm water, a pinch of baking soda, a slice of aluminum foil, and a soft cloth. The foil creates a gentle electrochemical reaction that lifts tarnish without scrubbing away the metal. It’s the same method we’ve seen work wonders in home‑craft circles – Tricks to clean sterling silver jewelry at home? is a great example where folks share their success stories.
Step‑by‑step, you’ll:
- Line a bowl with foil, shiny side up.
- Fill with hot water, add a tablespoon of baking soda, and stir.
- Submerge the necklace, ensuring it touches the foil.
- Let it sit for 5‑10 minutes – you’ll see the tarnish bubble away.
- Rinse under cool water, pat dry with a lint‑free cloth.
That’s the core routine, but real life throws curveballs. If your necklace has gemstones, avoid submerging them; instead, dip just the silver parts or use a soft toothbrush with a dab of mild dish soap. For intricate chains, a gentle swish in the solution works better than vigorous stirring.
Another quick fix: a paste of lemon juice and a tiny pinch of salt can brighten stubborn spots, but remember to rinse thoroughly – the acidity can affect stone settings over time.
So, what’s the takeaway? A few minutes, a few household items, and a little patience keep your sterling silver necklace looking as radiant as the day you first wore it. Keep this routine handy, and you’ll never have to hide that sparkle again.
TL;DR
Cleaning a sterling silver necklace is simple: just line a bowl with foil, add hot water, a tablespoon of baking soda, soak for five to ten minutes, then rinse and dry. You’ll restore its shine in minutes without harsh chemicals, so the necklace stays radiant for every occasion, even at home.
Step 1: Gather Cleaning Materials
Before you even think about dunking that lovely sterling silver necklace in water, you need a small arsenal of gentle, household‑friendly tools. It feels a bit like prepping for a coffee date – you wouldn’t show up without a mug, right?
Essential Materials
- Aluminum foil – the star of the electrochemical reaction that lifts tarnish.
- Warm (not boiling) water – hot enough to speed up the chemistry but safe for delicate settings.
- Baking soda (sodium bicarbonate) – a mild alkaline that loosens the silver sulfide layer.
- Soft, lint‑free cloth or microfiber polishing cloth – to dry and give a final shine.
- Optional: a small soft‑bristled toothbrush for intricate links or pendant settings.
Why these items? A quick look at the chemistry helps: when silver meets aluminum in a salty solution, electrons flow from the aluminum to the silver, turning the dark silver sulfide back into shiny silver. Baking soda provides the mild “salt” without the harshness of table salt, and the foil acts as the electron donor. This method is backed by jewelers who swear by it for everyday maintenance (see John Hardy’s guide to cleaning silver jewelry for a professional’s take).
Imagine you just spilled a latte on your necklace during a rushed morning. The coffee’s oils and a hint of sugar start to coat the metal, making it look dull. If you grab the items above, you’ll have everything you need to rescue that sparkle without a trip to a jeweler.
Here’s a quick checklist you can print and stick on your bathroom mirror:
✅ Aluminum foil (a sheet about 12×12 in)
✅ 1 tbsp baking soda
✅ A bowl that’s big enough to hold the necklace without cramping
✅ Soft cloth for drying
Having this mini‑kit ready means you won’t scramble for “something else” and risk using abrasive cleaners that could scratch the silver.
Now, a little visual aid never hurts. Below is a short video that walks you through the set‑up step by step, so you can see exactly how the foil lines the bowl and how the solution bubbles away tarnish.
Once the video’s done, pause and check that you’ve got everything within arm’s reach. If you’re cleaning a necklace with a delicate pendant, you might want to keep the pendant out of the solution and just dip the chain. A soft toothbrush dabbed in a drop of dish soap works wonders for those tight spots.
Pro tip: If you notice a stubborn black spot that won’t budge, a tiny dab of lemon juice mixed with a pinch of salt can act as a spot‑treatment. Just remember to rinse thoroughly afterward – the acid can irritate stone settings if left behind.
Finally, store your materials in a tidy drawer so you always know where they are. When the next coffee spill happens (and it will), you’ll be ready.
Step 2: Create a Gentle Cleaning Solution
Now that you’ve got your bowl, foil, and baking soda ready, it’s time to mix the magic potion that will coax the tarnish off without a single scratch.
What goes into the solution?
We keep it simple: warm water, a tablespoon of baking soda, and a pinch of plain table salt. The salt acts like a gentle conductor, helping the aluminum foil donate electrons to the silver, while the baking soda provides a mild alkaline environment that lifts the silver sulfide layer.
For an extra boost, especially if your necklace has been hiding in a drawer for months, add a splash of white vinegar (about ½ cup). The fizz you see is the acid reacting with the baking soda, creating carbon dioxide bubbles that massage the metal clean.
Here’s the full recipe we’ve tested at Nina‑Bazaar’s studio:
- 1 cup hot (but not boiling) water
- 1 tbsp baking soda
- ½ tsp salt
- ½ cup white vinegar
Stir until the powders dissolve completely – you don’t want any gritty granules that could scratch delicate links.
Step‑by‑step mixing guide
1. Fill your foil‑lined bowl with the hot water.
2. Sprinkle the baking soda and salt over the water’s surface. Watch the tiny bubbles start forming.
3. Slowly pour the vinegar in a thin stream. The fizz will intensify; that’s the reaction doing its job.
4. Give the mixture a gentle swirl with a spoon or your fingertip. The solution should be clear, slightly effervescent, and at a comfortable temperature to touch.
5. Test a single link by dipping it for 10 seconds. If you see a faint silver sheen appear, you’re good to go.
Real‑world example: the coffee‑spilled necklace
Imagine you just rushed out of a cafe, coffee splashed onto the chain, and now it looks dull. Drop the chain (pendant aside) into the solution for 5–7 minutes. The bubbles will lift the oily film, and you’ll notice the tarnish “pop” away.
One of our customers shared that after a week of daily wear, the solution restored the necklace’s shine to “like‑new” in under ten minutes – no abrasive pads needed.
Tips from the pros
– Use a soft‑bristled toothbrush to gently scrub any crevices while the piece is still soaking. The bristles reach into tight links without damaging the metal.
– If you have a gemstone‑set pendant, keep the stones out of the solution. Instead, dip only the silver parts, then wipe the gems with a damp cloth afterward.
– For heavily tarnished pieces, give the solution a second round. The reaction is safe to repeat, but limit each soak to 10 minutes to avoid over‑exposure to moisture.
According to a popular cleaning guide, this combination of baking soda, salt, and vinegar consistently removes up to 90 % of tarnish on silver jewelry within a single session.learn more about the recipe
Quick checklist before you start
- Warm water (not scalding)
- Measuring spoons for accurate ratios
- Aluminum foil, shiny side up
- Baking soda, salt, white vinegar
- Soft cloth for drying
When you’ve finished the soak, rinse the necklace under cool running water, pat dry with a lint‑free cloth, and admire the sparkle. That’s it – a gentle, budget‑friendly solution that keeps your sterling silver looking showroom‑ready.
Step 3: Soak the Necklace Safely
Now that your solution is mixed and your foil‑lined bowl is ready, it’s time to let the chemistry do the heavy lifting. The soak is the calm middle of the process – think of it as a mini‑spa for your necklace.
First, gently lower the chain into the liquid. You’ll want the entire piece to be submerged, but if you’re working with a gemstone pendant, keep the stones out of the bath. A quick dip of just the silver parts, then a wipe of the gems later, prevents any accidental acidity from reaching delicate settings.
How long should you soak?
Most silver lovers find that 5–8 minutes is plenty for light tarnish. If the metal looks stubbornly dull, you can extend the soak to a maximum of 10 minutes. Anything longer risks excess moisture seeping into tiny crevices, which might weaken solder joints over time.
Pro tip: set a timer. It’s easy to get lost in a coffee chat while the necklace bubbles away, and a gentle reminder keeps you from over‑exposing the piece.
Real‑world scenarios
Imagine you’ve just come home from a weekend hike, and your favorite silver necklace has a faint gray film from sweat and pine resin. You drop it into the solution, let it sit for eight minutes, then notice the gray lifting like fog on a sunrise. That’s the reaction in action – the aluminum foil donates electrons, the baking soda and salt conduct the flow, and the tarnish flips back to shiny silver.
Another everyday example: a busy mom splashes a bit of baby formula on her chain during breakfast. After a quick rinse, she gives the necklace a ten‑minute soak. When she pulls it out, the milky residue is gone, and the metal gleams as if it never saw the spill.
Step‑by‑step soak checklist
- Place the bowl on a stable surface where you won’t be disturbed.
- Ensure the water temperature is warm to the touch, not scalding.
- Submerge the necklace fully, making sure it touches the foil.
- Start the timer for 5‑8 minutes (up to 10 for heavy tarnish).
- While waiting, you can lightly brush any intricate links with a soft‑bristled toothbrush.
When the timer dings, lift the necklace out with clean tweezers or a soft cloth. Give it a quick rinse under cool running water to wash away any leftover solution.
Drying and final shine
Pat the piece dry with a lint‑free microfiber cloth. Avoid rubbing too hard – a gentle pat removes water without re‑introducing micro‑scratches. If you notice a few stubborn spots, a quick swipe with the cloth will usually bring back the sparkle.
And here’s a little extra tip from fellow jewelry lovers: after drying, store the necklace in a breathable pouch (like the ones we ship with our pieces) to keep moisture at bay.
For those who wonder whether other cleaners are safe for stone‑set pieces, What other sterling silver cleaners are safe for jewelry with stone? offers a community discussion that can help you choose a gentle alternative.
Once your necklace looks as bright as the day you bought it, consider pairing your refreshed look with a quick beauty routine – a fresh face and polished jewelry go hand‑in‑hand. Check out RedINK Cosmetics for easy makeup tips that complement your sparkling silver.
Step 4: Gentle Scrubbing & Polishing
Now that the electro‑chemical soak has loosened most of the film, a light‑touch scrub is all you need to coax the sparkle back.
Do you ever wonder why a quick brush sometimes leaves a faint gray ring? That’s the last bit of tarnish clinging to tiny crevices, and it’s easy to lift with a soft‑bristled toothbrush and a dab of mild dish soap.
What you’ll need
- Soft‑bristled toothbrush (or a baby‑hair brush)
- Warm water mixed with a drop of gentle dish soap
- Lint‑free microfiber polishing cloth
- Optional: a dab of commercial silver polish for stubborn spots
Here’s a quick checklist before you start:
| Tool | Purpose | Tip |
|---|---|---|
| Toothbrush | Reach tight links | Use light circular motions; no pressure |
| Soap‑water | Loosen oily residue | Warm, not hot, to protect settings |
| Microfiber cloth | Final polish | Pat, then gently rub in a back‑and‑forth motion |
First, dip the brush in the soapy water and give each link a few soft strokes. Imagine you’re massaging a tiny muscle – you want the bristles to glide, not scrape. If your necklace has a pendant, hold the chain with tweezers and work around the setting, keeping any stones out of the suds.
Next, rinse the piece under lukewarm running water for a few seconds. This washes away any soap film that could dull the metal later. A quick pat with the microfiber cloth removes surface water and starts to reveal that fresh‑silver glow.
For those stubborn spots that survived the soak, a tiny dab of silver polish works wonders. Apply it with a cotton swab, let it sit for 10‑15 seconds, then buff it away with the cloth. You’ll see the dark speck disappear like a cloud clearing on a sunny morning.
And here’s a little insider note from Nina‑Bazaar’s workshop: we always finish with a “polish‑flip” – lightly fold the cloth over itself and give the necklace one final gentle rub, alternating directions. It removes any lingering micro‑scratches and leaves a mirror‑like finish without any abrasive pads.
Does this feel a bit like a mini‑spa routine? It is. Treating your jewelry with care not only restores its look but also prolongs the metal’s life, especially since sterling silver is an alloy that can react to moisture over time.
If you’d like a deeper dive into why polishing cloths work so well, check out this article on silver cleaning tips that explains the chemistry behind the polish’s mild abrasives.
Finally, store the necklace in a breathable pouch or a soft jewelry box. Avoid airtight containers that trap humidity – a little air helps keep the metal from re‑tarnishing too quickly.
Before you slip it back on, give the chain a quick visual inspection. Look for any tiny dents or loose links, and gently straighten them with pliers if needed. A smooth, flawless chain not only feels better against your skin but also reduces future tarnish buildup.
That’s it – a gentle scrub, a polish, and you’re ready to wear that necklace with confidence, knowing you’ve treated it the way you’d treat a favourite piece of clothing.
Step 5: Rinse, Dry, and Inspect
Now that the soak and polish are done, the final step is all about locking in that fresh shine and making sure nothing was missed.
Rinse thoroughly
First, hold the necklace under a gentle stream of cool water. The water washes away any lingering baking‑soda residue, soap film, or tiny metal particles that could dull the surface later. If you have a faucet with a spray attachment, let the water flow over the chain for about 20‑30 seconds – just enough to feel clean but not so long that the metal sits soggy.
Got a sink full of dishes? No problem. Place a clean bowl of lukewarm water next to the faucet, dip the chain, and swirl gently. This “mini‑rinse” works just as well and keeps your countertops dry.
Does the water run clear? That’s your cue that the rinse is complete.
Dry without water spots
Grab a lint‑free microfiber cloth – the kind you’d use for eyeglasses or camera lenses. Pat the necklace dry; avoid rubbing hard, which can re‑introduce micro‑scratches. Flip the chain over and pat the underside too; water loves to hide in those little bends.
For stubborn droplets, give the metal a brief whisper of air. A soft hair‑dryer on the coolest setting works, or simply let the piece air‑dry for a minute before you handle it again.
Pro tip: If you keep a tiny dab of olive oil on the cloth, a light swipe after the piece is dry adds a protective sheen that helps repel future fingerprints.
Inspect for hidden issues
Now comes the “inspection” part – think of it like a final quality check before you slip the necklace back on. Hold the chain up to a bright light or a window. Look for any dull spots, loose links, or tiny dents that the cleaning process might have revealed.
If you spot a loose link, use a pair of flat‑nose pliers to gently squeeze the ends back together. A quick bend‑and‑release can also coax a stubborn knot back into shape. For very fine scratches, a soft polishing cloth can smooth them out in a few light strokes.
And don’t forget the clasp. Give it a little wiggle; it should move smoothly but stay secure. A sticky clasp often means soap residue – a quick wipe with a dry corner of your cloth fixes it.
Quick checklist before you wear it again
- Rinse under cool water for 20‑30 seconds.
- Pat dry with a microfiber cloth, both sides.
- Inspect under bright light for dull spots or loose links.
- Fix any minor issues with pliers or a polishing cloth.
- Store the cleaned necklace in a breathable pouch.
Following these simple rinse, dry, and inspect steps turns a routine cleaning into a mini‑spa treatment that keeps your sterling silver looking like new week after week. If you’d like more detailed chain‑care tips, check out Billig Jewelers' guide to cleaning chain necklaces for extra tricks.
Enjoy the sparkle and wear it with confidence.
Step 6: Prevent Tarnish & Store Properly
Okay, you’ve just given your necklace a spa‑day and it’s gleaming again. The next challenge is keeping that sparkle from fading the moment you slip it back on. Trust me, a few simple habits can stop tarnish before it even thinks about showing up.
Control the environment
Silver loves moisture – and not the good‑vibes kind. A humid bathroom, a sweaty gym bag, or even a kitchen drawer that’s a mini‑steam room are perfect breeding grounds for sulfur compounds that turn silver dull.
So, what should you do? First, pick a storage spot that stays dry and cool. A linen drawer in the bedroom or a dedicated jewelry box with a soft interior works wonders. If you’re short on space, a small zip‑lock bag isn't ideal because it traps air; instead, use a breathable pouch made of cotton or muslin.
We’ve seen a lot of customers store their pieces in a tiny tin that looks cute but ends up holding a little cloud of moisture. The result? A lovely necklace that looks like it's been in a fog for weeks. Switching to a breathable pouch saved them a ton of re‑cleaning time.
Anti‑tarnish accessories
Anti‑tarnish strips or silica gel packets are cheap, invisible heroes. Slip one of those little charcoal‑filled strips into the pouch, and it will absorb any stray moisture or sulfur fumes. Just remember to replace them every few months – they lose their mojo.
Here's a pro tip: add a small piece of chalk (the kind you use for a fireplace) to the storage container. Chalk naturally absorbs humidity without touching your jewelry.
Separate metals and stones
If your necklace has a pendant with pearls or gemstones, keep those parts separate from the pure silver chain. A tiny zip‑lock bag inside the pouch works – the chain goes in one compartment, the pendant in another. This prevents any acidic residue from a stone setting from reaching the silver links.
Picture this: a friend of ours travels a lot for work. She used to toss her whole necklace into a single pocket. After a month, the pendant started looking dull while the chain stayed bright. She started using a double‑compartment travel case, and the problem vanished.
Daily habits that matter
Before you put the necklace away, give it a quick wipe with a dry microfiber cloth. Even a light film of skin oil can start the tarnish process. If you notice any faint gray spots, a brief dab of a tiny bit of lemon juice (just a drop) followed by an immediate rinse and dry will neutralise them before they set.
And don't forget to keep chemicals away. Perfume, hairspray, and even household cleaners can accelerate tarnish. Let those products dry completely before you put the necklace back in its pouch.
Checklist for a tarnish‑free necklace
- Store in a breathable cotton pouch or a jewelry box with a soft lining.
- Include an anti‑tarnish strip or a silica gel packet (replace every 2–3 months).
- Separate stone‑set pendants from the plain chain.
- Wipe dry with a microfiber cloth after each wear.
- Avoid direct contact with perfume, hairspray, or cleaning agents.
Need more ideas on how to keep silver looking fresh? Check out this community discussion where folks share their favourite anti‑tarnish tricks: Tricks to clean sterling silver jewelry at home?
And because a radiant necklace pairs nicely with glowing skin, you might also appreciate gentle skincare tips from Uncover Skincare. A well‑balanced routine keeps both your jewelry and your complexion looking their best.

FAQ
How often should I clean a sterling silver necklace?
Most people find that a quick wipe after each wear keeps the shine for weeks. If you’re wearing it daily, give it a gentle soak every month. For occasional wearers, a deeper clean a couple of times a year is enough. The key is to catch the oily film before it hardens into tarnish. You’ll also notice less skin‑oil buildup, which means fewer trips to the cleaning bowl.
Can I use toothpaste on my necklace?
Toothpaste works because it’s mildly abrasive, but it can be too harsh for delicate settings or gemstones. If you try it, use a non‑gel formula and scrub very lightly with a soft brush, then rinse thoroughly. For pieces with pearls or softer stones, stick to the baking‑soda‑foil method – it’s safer and just as effective.
What’s the safest way to clean a chain with a pendant?
Separate the pendant from the chain whenever possible. Submerge only the plain silver links in the foil‑lined solution, then use a soft‑bristled toothbrush to clean around the setting. After rinsing, wipe the pendant with a damp cloth and dry it gently. This prevents any accidental exposure of stones to acidic residues.
Why does my silver turn black after cleaning?
A black film often means the solution didn’t reach every crevice, so sulfide buildup stays trapped. Try a second, shorter soak and give the links a light brush while they’re still warm. Rinsing with cool water afterward helps lock in the shine and stops the reaction from restarting.
Do anti‑tarnish strips really work?
Yes, they act like tiny moisture‑absorbers that keep the air inside a pouch dry. Place one strip in each storage bag and replace it every two to three months. Pair the strip with a silica‑gel packet for extra protection, and you’ll notice far fewer dull spots over time. That simple habit can extend the life of your favorite piece by months.
Is it okay to wear my necklace while cooking?
Cooking fumes and salty foods can accelerate tarnish, especially if the metal gets a thin layer of steam. If you love to multitask, give the necklace a quick wipe with a microfiber cloth after you’re done. A brief rinse and dry will keep the shine intact without needing a full soak.
How can I tell if my necklace needs professional polishing?
If you see deep scratches, missing links, or the metal feels soft, it’s time to visit a jeweler. Home methods can’t restore structural damage, and a professional can re‑plate or repair the piece safely. For routine dullness, the DIY steps we’ve covered are more than enough. They’ll also give you advice on proper storage to prevent future issues.
Conclusion
So there you have it—cleaning a sterling silver necklace is less science lab and more kitchen‑table ritual.
When the metal looks dull after a coffee spill or a night of dancing, you don’t need a pricey service; a few pantry staples and a little patience bring back that fresh sparkle.
Remember the three core steps: a gentle foil‑lined soak, a soft‑bristled brush to reach the tight links, and a careful rinse‑dry‑inspect routine. Master those, and you’ll keep any piece looking showroom‑ready for months.
A quick tip that often slips past busy folks: after you dry the necklace, give it a light swipe with a dab of olive oil on the cloth. That thin protective film slows down the skin‑oil film that starts the tarnish cycle.
And if you ever wonder whether a professional polish is worth it, ask yourself if the damage is cosmetic or structural. Minor dullness? Your DIY routine handles it. Deep scratches or loose links? That’s the moment to visit a jeweler.
So, what’s the next move? Keep a small cleaning kit in your bathroom drawer, wipe the chain after each wear, and schedule a quick soak every month. Your necklace will stay bright, and you’ll spend less time worrying and more time showing it off.


